
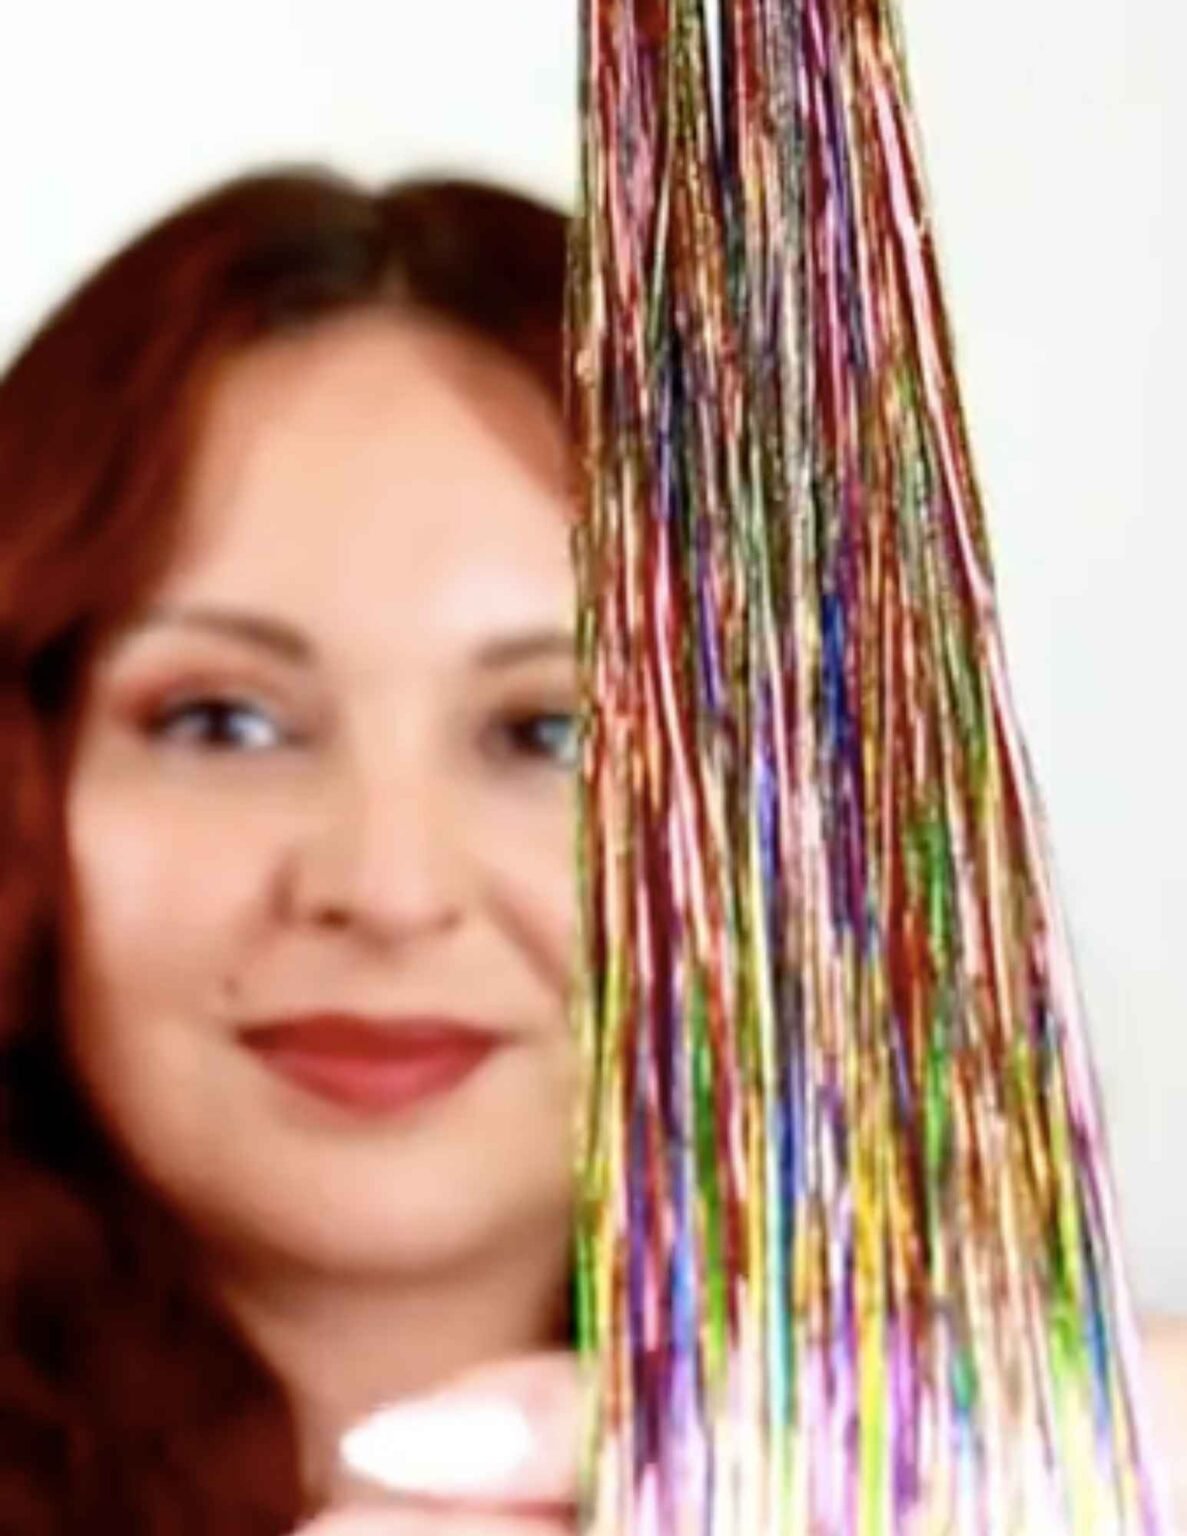
Adding a touch of shimmer to your hair can really change things up, giving you a fun and bright appearance. Hair tinsel, with its shiny threads, offers a simple way to get that extra sparkle. It is that perfect accessory for celebrations, concerts, or just when you feel like having a bit of extra glam in your everyday life. Lots of people are finding joy in this temporary hair adornment as we head into the cooler months of late 2023, looking for ways to brighten up their look for holiday gatherings or simply to add a cheerful touch.
You might be wondering how to get those delicate, shimmering strands to stay put in your hair. While some folks try to tie them in by hand, using the right tools can make the whole process much smoother, more secure, and honestly, a lot less frustrating. This guide will walk you through exactly how to put hair tinsel in with tools, making sure your sparkle lasts.
Whether you're aiming for a subtle glimmer or a full-on cascade of light, having the proper gear and knowing the best methods makes all the difference. It's almost like giving your hair a little party favor, and who doesn't love a good party? So, let's get ready to add some serious shine to your locks.
Table of Contents
- Why Choose Tools for Tinsel?
- Gathering Your Sparkle Supplies
- Preparing Your Hair for Shine
- Step-by-Step: How to Put Hair Tinsel In with Tools
- Tips for a Lasting Sparkle
- Caring for Your Tinselled Tresses
- Removing Your Tinsel
- Frequently Asked Questions About Hair Tinsel
Why Choose Tools for Tinsel?
You might wonder if using tools is truly necessary for putting in hair tinsel. Well, consider this: tools offer a level of precision and security that is quite difficult to achieve with just your fingers. They help you attach the tinsel closer to the scalp, which means it blends more naturally with your hair and stays put for a longer time.
Using the right tools also means less tugging and pulling on your hair, making the application process more comfortable for you. It also helps prevent damage to your natural strands. Plus, for those who find tying tiny knots a bit fiddly, tools can simplify the whole procedure, making it accessible even for beginners.
It's almost like trying to build something without the right screwdrivers or wrenches; you could probably manage, but it would be a lot harder and the result might not be as sturdy. Tools just make the job easier and the outcome better, really.
Gathering Your Sparkle Supplies
Before you begin your sparkling hair adventure, you'll want to gather everything you need. Having all your supplies ready makes the process flow smoothly and helps prevent any mid-application interruptions. Think of it like preparing your art supplies before you start painting; it just makes sense.
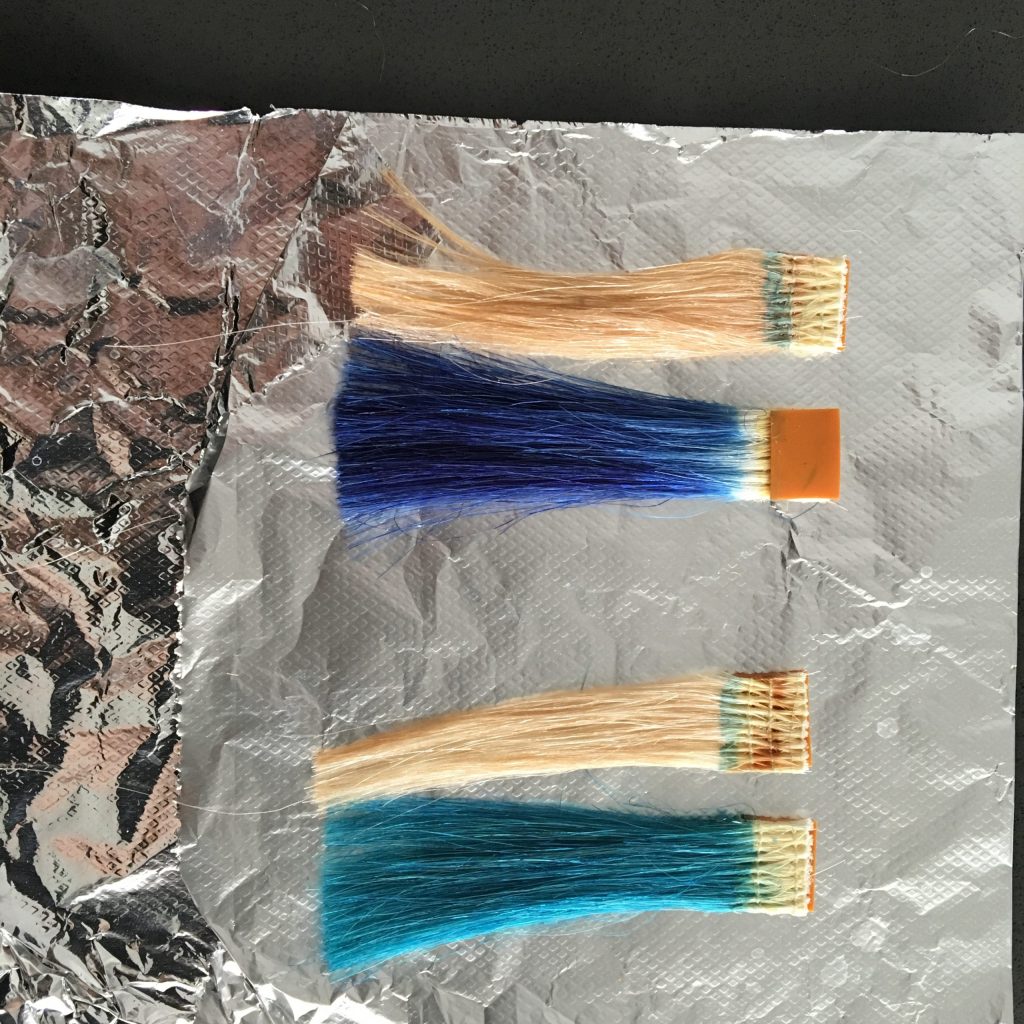
The Tinsel Itself
Hair tinsel comes in many colors and finishes. You can find iridescent ones that catch the light in different ways, or solid metallic shades for a bolder statement. Pick a color or a mix of colors that really speaks to your personal style or matches the occasion you have in mind.
Most tinsel comes in long strands, often folded over. You'll want to choose a good quality tinsel that is heat-resistant, especially if you plan on using styling tools like flat irons or curling wands on your hair after application. This helps keep the tinsel looking its best and avoids any melting mishaps, too it's almost a must-have feature.
Essential Application Tools
These are the items that truly help with how to put hair tinsel in with tools.
- Micro-Link Beads or Silicone-Lined Beads: These tiny beads are often used for hair extensions. They come in various colors to blend with your hair. The silicone lining helps grip the hair and tinsel securely without slipping.
- Pliers (for Micro-Links): You'll need a special pair of pliers designed for crimping micro-links. These pliers gently squeeze the beads flat, securing the tinsel and hair together. They are shaped to give a good, firm press without damaging the bead or your hair.
- Loop Tool (or Threading Tool): This thin wire tool, often with a small loop at one end, is used to pull strands of hair and tinsel through the micro-link beads. It makes threading the tiny bead much, much easier.
- Hair Clips or Sectioning Clips: These are very helpful for holding back sections of hair you're not working on. This keeps your workspace tidy and prevents accidental tinsel attachments.
Helpful Extras
While not strictly necessary for how to put hair tinsel in with tools, these items can make the experience even better.
- Fine-Tooth Comb or Rat-Tail Comb: Great for creating clean, small sections of hair. The pointed end of a rat-tail comb is especially useful for this.
- Mirror (preferably a large one or a magnifying mirror): A good view of your head helps a lot. If you're doing your own hair, a two-sided mirror or a setup with mirrors can be quite useful.
- Scissors: For trimming the tinsel to your desired length after it's in. Make sure they are sharp for a clean cut.
- Hair Elastics or Small Rubber Bands: Useful for temporarily securing sections of hair or holding the tinsel strands together before application.
Preparing Your Hair for Shine
Before you even think about how to put hair tinsel in with tools, you'll want to get your hair ready. Clean, dry hair is usually best for tinsel application. Any oils or product buildup can make it harder for the tinsel to grip or stay in place.
Wash and fully dry your hair. If you use conditioner, make sure to rinse it out very well. You can apply a heat protectant if you plan to style your hair with heat later, but avoid heavy styling products like hairspray or mousse right before application, as they can make the hair sticky or slippery, actually.
Brush your hair thoroughly to remove any tangles. This helps ensure that the sections you pull are smooth and free of knots, which is pretty important for a clean application. A smooth base really does make a difference.
Step-by-Step: How to Put Hair Tinsel In with Tools
Now for the main event: learning how to put hair tinsel in with tools. We'll cover two popular methods that use tools for a secure hold.
Method 1: The Micro-Link or Bead Technique
This method is known for its durability and is often used by professionals. It gives a really secure hold, so your tinsel will stay put for a good while.
Step 1: Get Your Tinsel Ready
Take a strand of hair tinsel and fold it in half, creating a loop at the top. You'll want to use one folded strand per micro-link bead. This gives you two shimmering pieces from one application point, which is nice.
Step 2: Section Your Hair
Using your fine-tooth or rat-tail comb, create a very small section of your natural hair. This section should be about the same thickness as a few strands of tinsel. It's usually best to start underneath your top layer of hair, near the back of your head, so the tinsel is a bit hidden at first, if you want that look.
Use a clip to hold back any surrounding hair you're not working on. This helps keep things neat and prevents accidental snagging, you know, which can be annoying.
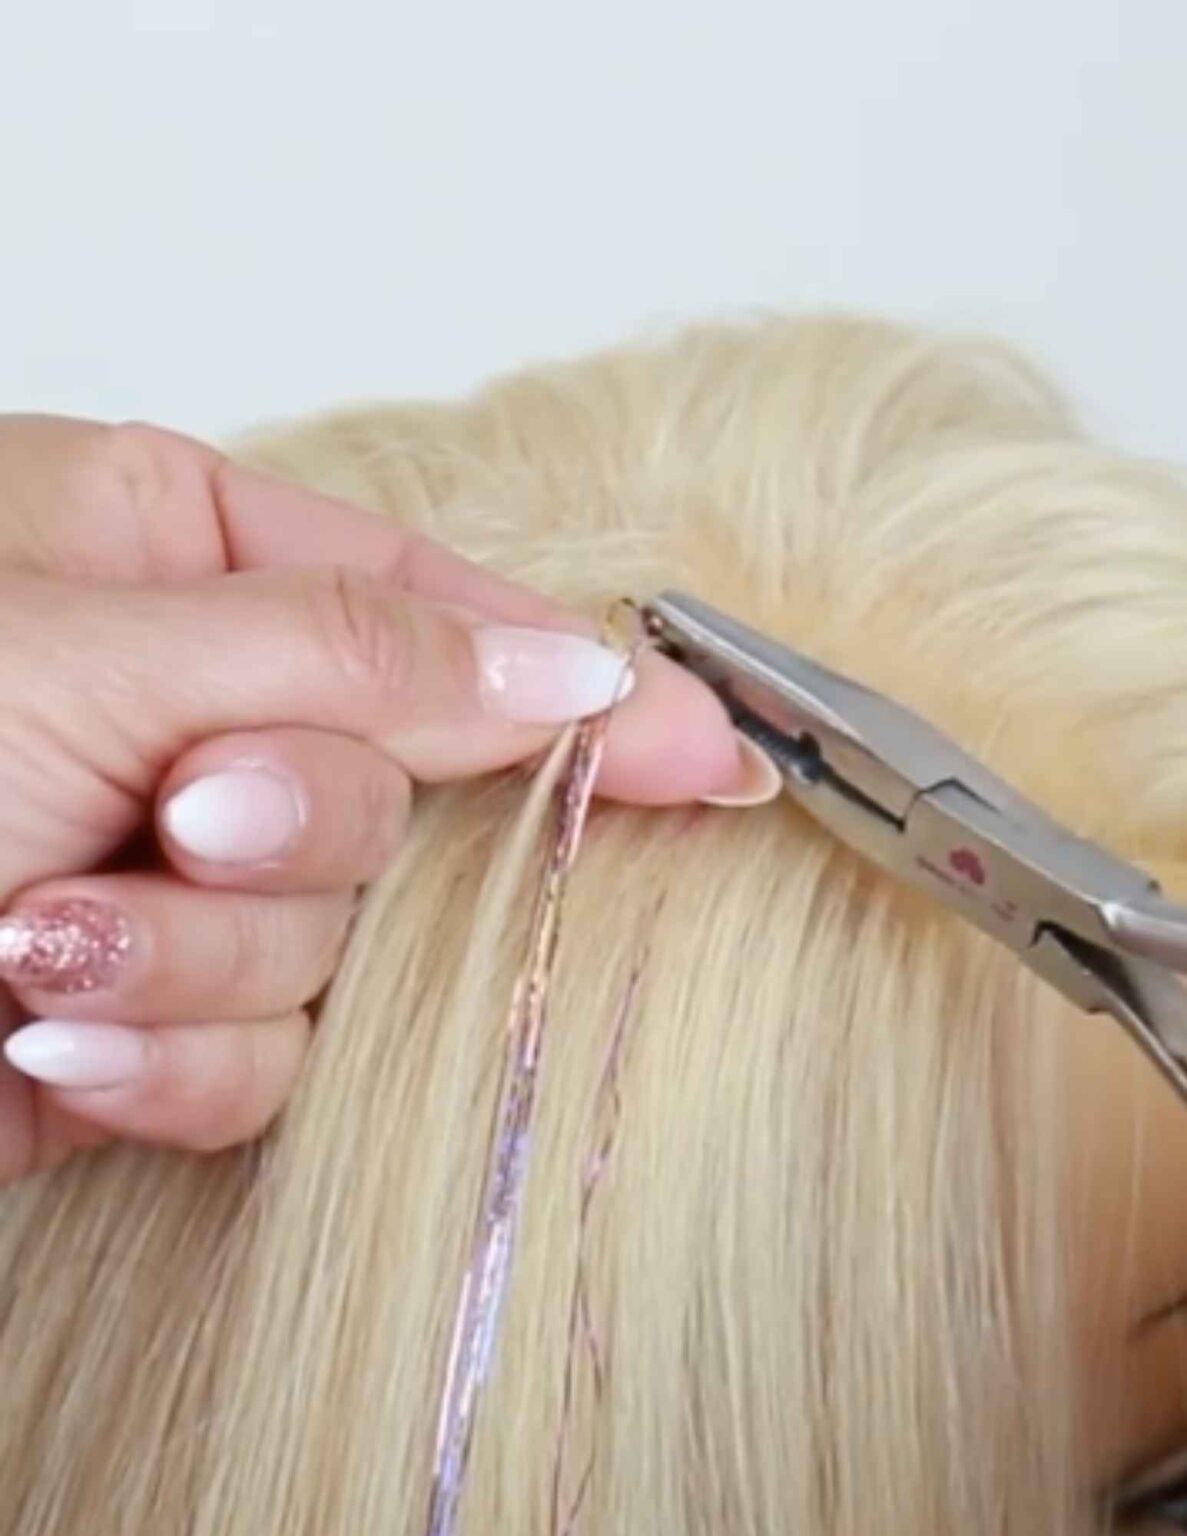
Step 3: Thread the Micro-Link Bead
Take your loop tool. Slide a micro-link bead onto the wire loop of the tool. It might seem small, but it slides on pretty easily. Make sure the bead is resting near the base of the loop tool.
Next, gently hook the small section of your natural hair with the loop tool. Pull the hair through the micro-link bead using the loop tool. You want the bead to slide down onto the hair, almost to your scalp.
Step 4: Add the Tinsel
Now, take your folded tinsel strand. Insert the looped end of the tinsel through the micro-link bead, right alongside your natural hair. So, both your hair and the tinsel loop are now inside the bead.
Make sure the tinsel is sitting evenly, with both ends hanging down. You want it to be snug but not pulling on your hair, that's important.
Step 5: Crimp the Bead
Using your pliers, gently but firmly crimp the micro-link bead flat. You want to press it until it's secure and doesn't move. Be careful not to crimp too hard, as you don't want to damage your hair, but you do need it to be tight enough to hold everything.
Give the tinsel a very gentle tug to check if it's secure. If it slips, you might need to re-crimp or use a new bead, which happens sometimes.
Step 6: Repeat and Trim
Continue this process, adding tinsel strands where you want them. You can space them out for a subtle look or place them closer together for more sparkle. Once all your tinsel is in, use your scissors to trim the tinsel strands to the desired length, matching your hair or leaving them a little longer for a dramatic effect. That's pretty much it for this method.
Method 2: The Loop Tool and Knot Technique
This method also uses a loop tool but relies on a knot rather than a bead for attachment. It's a bit simpler in terms of tools needed, but the knot needs to be very secure.
Step 1: Prepare Your Tinsel
Take one strand of tinsel and fold it in half, just like with the micro-link method. This creates a loop at the top, which is what you'll work with.
Step 2: Section Your Hair
Again, choose a very small section of your natural hair. This section should be thin, about the size of a few strands of tinsel. Use your comb to get a clean separation, and clip away other hair as needed.
Step 3: Thread Hair Through Tinsel Loop
Take the folded tinsel strand. Use your loop tool to thread the small section of your natural hair through the loop of the tinsel. So, your hair is now passing through the tinsel's loop.
Pull the hair through until the tinsel loop is sitting close to your scalp. This is a crucial step for a neat finish, you know.
Step 4: Tie the Knot
Now, this is where the knot comes in. Take the two ends of the tinsel and tie them around the small section of your natural hair, just above where your hair passes through the tinsel loop. You're essentially tying a small, very tight knot around your hair strand. A double knot is usually better for security.
Pull the knot tight, but be gentle so you don't pull your hair too much. You want it to be snug against your scalp without causing discomfort. It needs to be firm, that's for sure.
Step 5: Repeat and Trim
Continue adding tinsel strands using this knotting method. Space them out or cluster them as you like. Once you're happy with the amount of sparkle, trim the tinsel to match your hair length or leave it longer for a more noticeable look. That's how this way works, more or less.
Tips for a Lasting Sparkle
Getting the tinsel in is one thing; making it last is another. Here are some tips to help your shimmering strands stay put for as long as possible.
- Start with Clean Hair: As mentioned, clean hair provides the best grip. Avoid applying tinsel to hair that has a lot of product buildup.
- Small Sections are Key: Whether you're using beads or knots, very small, precise sections of hair work best. Too much hair in one section can make the tinsel slip, and too little might not hold the tinsel well.
- Practice Makes Perfect: The first few strands might feel a bit awkward, but you'll get the hang of it quickly. Don't get discouraged if it's not perfect right away.
- Placement Matters: Think about where you want the sparkle. For a subtle look, place tinsel underneath the top layer of your hair. For a bolder statement, place it around your face or on the top layers.
- Consider Hair Type: If you have very fine, silky hair, you might find the micro-link method more secure. For thicker hair, both methods can work well, but ensure your sections are small enough to fit into the beads or for the knot to be tight.
- Use Good Quality Tinsel: Cheaper tinsel can fray or melt easily. Investing in heat-resistant, durable tinsel will save you frustration.
- Don't Overdo It: While it's fun to add sparkle, too much tinsel can sometimes look less natural or feel heavy. A few well-placed strands can be more impactful than a whole head of it, sometimes.
- Check Your Work: After crimping or tying each piece, give it a gentle tug. This helps ensure it's truly secure before you move on to the next one.
Caring for Your Tinselled Tresses
Once your hair is sparkling, you'll want to keep it looking great. Proper care helps extend the life of your tinsel.
- Gentle Brushing: Be gentle when brushing your hair. Use a wide-tooth comb or a soft-bristle brush. Avoid brushing directly over the tinsel attachments, as this can loosen them.
- Washing Your Hair: You can wash your hair as usual, but be gentle around the tinsel. Use a mild shampoo and conditioner. Try to avoid scrubbing directly at the scalp where the tinsel is attached.
- Heat Styling: If your tinsel is heat-resistant, you can use heat styling tools like flat irons or curling wands. However, use lower heat settings and try not to hold the heat directly on the tinsel for too long. Excessive heat can still damage it, actually.
- Sleeping: To prevent tangling and preserve your tinsel, consider sleeping with your hair in a loose braid or a silk bonnet. This reduces friction, which can help keep the tinsel from getting messed up.
- Avoid Harsh Products: Try to keep hairsprays, gels, and other styling products away from the tinsel attachments. Some chemicals can weaken the hold or dull the tinsel's shine.
- Swimming: While some tinsel can withstand water, prolonged exposure to chlorine or saltwater might reduce its lifespan or dull its color. Rinse your hair with fresh water after swimming if you do decide to take a dip.
Removing Your Tinsel
When you're ready for a change, removing hair tinsel is usually pretty simple.
- For Micro-Link Method: Use your pliers to gently re-crimp the bead in the opposite direction (squeeze the sides that were flat). This will open the bead, allowing you to slide out the tinsel and your hair. Be very careful not to pull your hair.
- For Knot Method: Carefully locate the knot. You can usually gently untie it with your fingers or use a small, pointed tool (like the end of a rat-tail comb) to loosen it. If the knot is very tight, you might need to snip the tinsel itself just above the knot, being extremely careful not to cut your own hair.
Always take your time when removing tinsel. Rushing can lead to pulling or damaging your hair, which is something you definitely want to avoid. You want to be gentle, you know.
Frequently Asked Questions About Hair Tinsel
People often have questions when they're learning how to put hair tinsel in with tools or just thinking about trying it out. Here are some common queries:
How long does hair tinsel stay in?
The lifespan of hair tinsel really depends on how it's put in and how you care for it. With the micro-link method, it can often stay in for several weeks, sometimes even up to two months, especially if you're careful with your hair. The knot method might last a bit less, perhaps a few days to a couple of weeks. Your hair growth also plays a part; as your hair grows, the tinsel will move further from your scalp, eventually needing removal or reapplication. It's really about how much you want to keep it looking fresh.
Can you wash your hair with tinsel in it?
Yes, you can absolutely wash your hair with tinsel in it! Just be gentle around the attachment points. Use a mild shampoo and conditioner. Try not to scrub too hard at your scalp where the tinsel is secured. A gentle lather and rinse are usually fine. Remember to be extra careful when towel-drying your hair, patting rather than rubbing vigorously. This helps keep the tinsel from getting tangled or pulled. You want to be gentle, basically.
Is hair tinsel damaging to your hair?
When applied correctly with the right tools and removed gently, hair tinsel should not cause damage to your hair. The key is to use very small sections of hair for attachment and to avoid pulling or tugging during application or removal. Over-crimping micro-links or tying knots too tightly could potentially cause stress on your hair strands, so a light touch is important. Using heat-resistant tinsel also helps prevent damage if you plan to style with heat. It's mostly about careful handling, that's what it is.
Ready to add some extra sparkle to your life? Learning how to put hair tinsel in with tools opens up a world of dazzling possibilities for your hair. With a little practice and the right approach, you can enjoy shimmering strands that really catch the light. So, gather your supplies and get ready to shine!
For more beauty tips and hair ideas, you can always check out resources like Allure. Learn more about hair care and styling on our site, and for more specific guides, you can link to this page for other beauty tutorials.
Detail Author:
- Name : Bell Funk
- Username : king.monte
- Email : bette.barton@gmail.com
- Birthdate : 1982-12-06
- Address : 4620 Queenie Mews Apt. 629 Port Lempifort, MD 98174
- Phone : (631) 607-8321
- Company : Klein and Sons
- Job : Valve Repairer OR Regulator Repairer
- Bio : Illo provident ut qui aut voluptates. Neque id assumenda voluptatum expedita necessitatibus eum. Consequatur architecto qui sit.
Socials
tiktok:
- url : https://tiktok.com/@belle.jenkins
- username : belle.jenkins
- bio : Repellendus quam id reiciendis assumenda in corporis necessitatibus facilis.
- followers : 6076
- following : 1203
twitter:
- url : https://twitter.com/bellejenkins
- username : bellejenkins
- bio : A voluptas exercitationem ullam error ab voluptate. Ut sed totam rerum dolor quasi. Reprehenderit possimus sed nulla quidem voluptates iste.
- followers : 1809
- following : 2794
linkedin:
- url : https://linkedin.com/in/belle_jenkins
- username : belle_jenkins
- bio : Eveniet voluptate expedita doloribus non.
- followers : 5734
- following : 1217
instagram:
- url : https://instagram.com/jenkins1986
- username : jenkins1986
- bio : Deleniti dolor autem officiis dolore. Quibusdam autem libero sint quas.
- followers : 1566
- following : 1692
facebook:
- url : https://facebook.com/bellejenkins
- username : bellejenkins
- bio : Sequi ut occaecati omnis molestias vel dolor ea.
- followers : 2248
- following : 1351
